SaGa Scarlet Grace is the latest title in the SaGa series, released in December 2016 for the PlayStation Vita in Japan. An enhanced edition of the game subtitled "Hiiro no Yabou" (lit. Scarlet Ambition) was also released for the Nintendo Switch, PlayStation 4, on August 2, 2018, which featured a few enhancements to fix minor gameplay issues as well as additional story content. A few days later, Kawazu responded to a fan question on Twitter about an English release for the game, which Kawazu confirmed was in the works.
Story
Firebringer—an evil god, banished by the star gods for his betrayal. He is turned into a comet and sent away. Other dark demons that have been suppressed begin to become violent and the world falls into chaos.
The star gods grant power to one man. He leads the people in a war against Firebringer and establishes an empire.
The dark demons are pushed underground, and the evil god’s star leaves. After that, the evil god’s star returns every 150 years. For ages and ages, they meet Firebringer and his demons in battle.
Over time there are emperors who prepare diligently and defeat the evil god easily, but there are also emperors who are careless and drive the world into ruin.
Finally, after a seventh invasion, the evil god’s star was decimated. The war that lasted 1,000 years is brought to an abrupt stop. The people rejoiced to usher in peace.
Fragments of Firebringer rain down onto the earth, like fireworks celebrating the victory of the humans and star gods. If Firebringer is extinguished, even the empire would become unnecessary.
The empire continues to rule, and many places react with rebellion. This ties into a civil war by the emperor’s son and company. Amidst the chaos, a hero brings down Firebringer, the emperor is assassinated, and the empire collapses.
70 years later.
Hardly anyone who remembers the era of the empire is around anymore. The world remains in chaos. No one notices a new danger approaching. However, a new hero arises for the new era.[1]
Characters
Protagonists
Supporting Characters
Other Recruitable Characters
Gameplay
Scenario Selection
At the beginning of the game, you take a short quiz that will select a protagonist for you to play as. You can choose not to follow the quiz's selection, but depending on how you answer, the quiz can give the protagonists boosts in some of their stats.
The first chapter of Urpina's scenario starts much like a regular rpg, with Urpina having a set goal to complete. Once her first chapter is completed, there is more freedom to explore and do events. Urpina is recommended for series beginners.
Leonard's scenario offers the most freedom and events out of the four available scenarios.
The first chapter of Taria's scenario starts much like Urpina's scenario, with the first chapter revolving around a set goal and the subsequent chapters opening up. However, Taria focuses on casting rather than being a straightforward attacker, so she may be more difficult to use.
His scenario offers the least amount of freedom overall. Depending on the player's actions, his scenario may become even more constrained. [2]
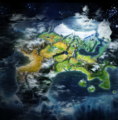
World
- NorthEast E.M. (北東界外)
- Marchiam Normi (ノルミ辺境州)
- Provincia Thracini (トラキニ州)
- Provincia Termina (テルミナ州)
- Provincia Cindrea (サンドリア州)
- Marchiam Ria (リーア辺境州)
- Mare Ilfee (イルフィー海)
- Provincia Cerenaif (セレナイフ州)
- Provincia Rhonicum (ロニクム州)
- Provincia Gladion (グラディオン州)
- Urbs Azhuacan (帝都アスワカン)
- Provincia Hibernia (ハイバーニア州)
- Provincia Jusitania (ユシタニア州)
- Marchiam Bicyniro (ビキニロ辺境州)
- SouthEast E.M. (南東界外)
- Provincia Kei (ケイ州)
- Provincia Maurehua (モウレワ州)
- Marchiam Megdasse (メグダッセ辺境州)
- Marchiam Yaxart (ヤクサルト辺境州)
- Marchiam Numadica (ヌマディカ辺境州)
Videos
Images
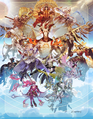
Illustration of the twelve star gods by Kuramochi
『SaGa SCARLET GRACE』TRAILER Vol.1
References
External Links
Navigation

|
| Locations
|
| Northeast Boundary
|
Sea Bridge - Outpost - Finemundi - Village of No Presence - Everbloom Tree - Porta Inferni - Abyssal Swamp - Fang Terrae - Spirit Lake - Adamas Shrine - Snowy Hut - Glacier Walls - Frozen Ship - Winter's Door - Frozen Fiend - Forest Dweller
|
| Marchiam Normi
|
Child Walk - Maiden Cliff - Moorhead - Ostdorf - Westdorf - Castle Kubera - Gusty George - Yomitana Sluice Gate - Neyott Thermocavern - Hide Hive - Yokilis Shaft - Tidemarch - North Sea Ruins - Snow Queen
|
| Provincia Thracini
|
Mt. Plinio - Elhuacan - Josgad Stable - Stabiae - Sea Bridge - Mulkna Sluice Gate - Nakisina Sluice Gate - Yomitana Sluice Gatee - Pantheon - Kusama Geyser - Old Geyser - TeHoru Geyser - Madayanti Stone - Daji Stone - Tamamo Stone - Rahol Knoll - Mira Cave - Nugia Hollow - Yuaba Shaft - The Creature of Lake Mulkna - Earth Serpent - Enigmatic Egg - Collector Nest - The Creature Returns
|
| Provincia Termina
|
Schut - Castle Knym - Moorhead - Josgad Stable - North Gate - South Gate - Taria's Workshop - Raven Manor - Liuhuang Vent - Beast Den - Wam i Mine - Phoenix - Earth Serpent - Bloody Howl
|
| Provincia Cindrea
|
Imhokiel Dam - Kilik - Taiffa - Yumen - Sanhigh - Ur-Saqqara - Saqqara - Castle Knym - Perrault Cave - Basile Hole - Syowyo Mound - Grimms Mine - Earth Serpent - Karkinos
|
| Marchiam Ria
|
Ferrol - Betanzos - Coruna - Muros - Arousa - Pontevedra - Vigo - Abandoned Village - Cocoon - Water Mirror - Festival Stage - Faerie Stone - Fiends' Nest - Omni Relief
|
| Mare Ilfee
|
Edinport - Battlwick - New Wise - Longstone Lighthouse - Limerock Lighthouse - Middle Range Lighthouse - Sugar Castle Lighthouse - Gard Island Lightvessel - Hazard Reef - Mermaid Rock - Phantom Warship - Charybdis - Eilean Ceo - Spirit Coal Mine - Diemazu Temple - Diemazu Shrine - Driftage Coast - Provincia Thracini Border - Provincia Cerenaif Border - Cave of Zihg - Wanderer of the Seas
|
| Provincia Cerenaif
|
Castle Parm - Zegna - Nipelo - Cingular - Water Mill - Imhokiel Temple - Westend Graveyard - Central Cemetery - Eastend Cemetery - Spring Cave - Castello Guscio - Haunted State - Labyrinth - Pyro Mine - Roadblocker
|
| Provincia Rhonicum
|
Silmium - Lug - Nekwa - Castle Parm - Marigan Temple - Fort Kathrin - Boathouse - Tveak Tower - Lyajg Bog - Drear Rock - Earth Serpent - Dark Forest - Trampling Despair
|
| Provincia Gradion
|
Testika - Sanhigh - Yumen - Hibernian Border - Bicornia - Pixkimarigan - Adamas Tower - Fort Kathrin - Forest Hut - Bollinger Mine - Jardina Mine - Tula Mine - Shrine - Budding Desire
|
| Urbs Azhuacan
|
Central Palace - North Market - South Market - Black Market - Imperial Library - Marigan Temple - Kada Temple - Macha Temple - Imhokiel Temple - Astel Temple - Diemazu Temple - Shaams Temple - North Pier - South Pier - Teleportation Device - Arena - Trampling Despair
|
| Provincia Hibernia
|
Grove of Silence - Ceobhran - Makulilkali Fortress - Castle Fomoire - Teach na Macha - Rainbow Bridge - Fire Aes Mine - Earth Aes Mine - Water Aes Mine - Sealed Cave - Earth Serpent - Grasslands Cabin - Gora Heights - Lofty Malice
|
| Provincia Jusitania
|
Grumon - Castle Fomoire - Misery - Nanim - Deserted Village - Astel Convent - Spira Tower - Tveak Tower - Seaside Shop - Carl Falls - Donseilla Mine - Lupagal Cave - East Jungle - West Jungle - Enigmatic Skeleton - Stash of Suspect Goods - Man Swinging Pickaxe - Collector Nest - Beckoning of the Abyss
|
| Marchiam Bicyniro
|
Nekwa - Pescara - Anchiano - Caprese - Maelstrom - Noono Forest - Aslana's Studio - Diving Well - Cave Stuffed with Treasure - Cave Crammed with Fiends - Place with the Final Boss - Trampling Despair
|
| Southeast Boundary
|
Nameless Peninsula - Birdman Village - Moa - Torii - Enigma Jungle - Fork Falls - Phoenix's Nest - Blue Hole - Hole of Chaos - Corner Isle - The Confounder
|
| Provincia Kei
|
Castle Kohan - Nangoon - Owtie Arbor - Taiffa - Rowsui Tower - Bullio Gate - Azhuacan Ferry - Mountain Hut - Nomadic Settlement - Unremarkable Tree - Old Well - Sigfrei's Well - Pot Falls - Rugged Mountain - Somondoco - Great Arch - Earth Serpent - Phoenix - One Who Sates the Earth
|
| Provincia Maurehua
|
Prayer Tower - Kilik - Shaams Temple - Owtie Arbor - Gusty Gorge - Halsa - West Mine - North Mine - South Mine - Hot Spring - Phoenix - Collector Nest - Hot Springs Rana
|
| Marchiam Megdasse
|
Highsha Quarters - Highsha Observation Tower - Walomir Quarters - Walomir Observation Tower - Kaikow Quarters - Kaikow Observation Tower - Nyu Quarters - Nyu Observation Tower - Megdasse Floodgate - Bullio Gate - Secret Passage - Lake Megdasse - Spiritdrop Cave - Stardrop Cave - Infernodrop Cave - Fragata Mine - Mono Dungeon - Reiche Caves - Giant Plant - Megdasse Glyphs - Apple Tree - Tornado - Walomir Sheep - Earth Serpent - Chupacabra
|
| Marchiam Yaxart
|
Stahl - Astel Shrine - Rowsui - Bartlett Shrine - Diemazu Shrine - True Diemazu Shrine - Imhokiel Gate - Kada Shrine - Macha Shrine - True Macha Shrine - Rowsui Tower - True Marigan Shrine - Shaams Shrine - Tejedura Shrine - Tukuz Shrine - Twai - True Uzume Shrine - New Cave - Mysterious Cave - North Hole - West Knoll - East Dungeon - South Shaft - Forbidden Point - Burned Dancer - Phoenix - Earth Serpent
|
| Marchiam Numadica
|
Imhokiel Gate - Chyokun - Belike - Ashina - Excavation Sites - Destroyed Temple - Coastal Keep - Salt Cave - Shaams Cave - Weapon-Like Object - Hive - The Weakest of All
|
| Ancient Cities
|
Ei-Hanum - Dizahab - Ur-Saqqara
|
|


