Welcome to the SaGa Wiki! We have moved off Fandom very recently, so things are still being set up around here. Please note that some images did not successfully transfer, and will need to be manually reuploaded or replaced.
Note: Keep in mind that once you have an account, you must wait one day and make 5 edits to become autoconfirmed. This allows you to skip questions while editing, to create new articles, and to upload images.
Romancing SaGa Re;univerSe Guide
This is a guide which contains information and details for the mobile game Romancing SaGa Re;univerSe. Use CTRL+F to find the topic you're looking for.
Further frequently asked information about this game can be referred to at the following link: https://support.jp.square-enix.com/faq.php?id=17621&pv=20&page=0&c=0&sc=0&la=0&so=0&q=
Device Specification[edit]
Device compatibility can be found at this link: https://support.jp.square-enix.com/faqarticle.php?kid=77718&ret=main&id=17621&la=0&pv=20
Installation[edit]
The game can only be installed and played on mobile devices.
Android Devices[edit]
In order to install the game on your Android device, players will need to access the Japanese Googleplay store. They must navigate to the game's page in the game store and ultimately download the game from there.
Alternatively, players can install the game's apk onto their phones to facilitate this process. Third-party sources such as APKPure and Qooapp will assist in installing the game to your mobile device. Links to those sources will not be provided here.
Google Play Store link: https://play.google.com/store/apps/details?id=com.square_enix.android_googleplay.RSRS
Apple Devices[edit]
In order to install the game on your Apple device, players will need to access the Japanese iTunes store. They must navigate to the game's page in the game store and ultimately download the game from there. The Japanese iTunes store will require a Japanese iTunes account to access the game.
iTunes Store link: https://itunes.apple.com/jp/app/id1397702917?mt=8
Data Transfer[edit]
Data for this game can be saved via Googleplay or Facebook. Connecting your game data to any of these platforms will ensure that you can transfer your data from device to device. In order to save this data, you will need to access the correct menu and press the appropriate buttons.
The following will ensure you get to the data transfer screen to set up your game data on the following platforms:
- 1. On your home screen, press the drop-down button on the top right.
- 2. Press the first button on the drop-down.
- 3. Press the third button on the right row.
- 4. Select either Googleplay or Facebook.
- 5. To ensure that the game data has been saved, there will be a small black bar engraved to the left of the button.
The following will ensure you transfer your data to another device.
- 1. Install the game on another device and enter the title screen.
- 2. From the three options on the bottom of the title screen, press the middle button.
- 3. Select either Googleplay or Facebook.
- 4. After connecting, press the start button.
Gameplay[edit]
Menus[edit]
Title screen[edit]

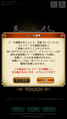
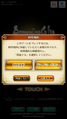
The Title screen shows the current version of the application and your user ID at the top left of the screen. Pressing TOUCH will start the game. Headphones are compatible with the game. On the bottom of the screen are three buttons. The first button shows you the current news and events in the game. The second screen shows another screen asking if you would like to transfer your account to this device. The first button which is brown will bring you back to the Title screen. If you select the second button which is orange, a new screen will pop up asking if you want to transfer your account from either Google Play or Facebook. Select either and you will be logged onto your account on that device. The third button on the bottom screen is an Inquiry button in which you may contact the developer with any issues you may have. Upon pressing Touch, a new screen will be prompted which shows several buttons. The top two yellow buttons are Legal Liabilities and Square Enix's Terms and Conditions. The first brown button is to cancel out of that screen and the second button is to create a new account. Upon pressing the create account button, your user name will be provided at the top left and the game will ask if you want to install new data. Pressing the second button on that screen will install the new data.
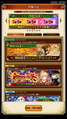
News screen from the Title screen.
Account Transfer screen with brown button NO and orange button YES.
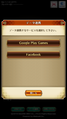
Account Transfer screen with either Google Play or Facebook as transfer choices.
Inquiries screen from the Title screen.
Create New Account screen.


Home screen[edit]

From the Home screen, players have access to a plethora of game features. On the top of the screen, players can recharge their gems via real-money currency or they can recharge their energy either via potions or gems. Your money is also shown on the top of the screen. Players can also see other players walking around on their Home screen. The avatars of the players are based on whatever character they had designated as their selected character in their profile settings. When clicking these avatars, they will present unique dialogue specifically for that character.
Clicking the drop-down button on the top right yields several options. Players can access the menu option which allows them to manipulate the settings, change player info and etc. They also have access to the in-game announcements. Presents received from logging in or as compensation can be obtained. Missions and achievements are listed and allows players to receive rewards for completing them. An option to check out a guild is available but there is currently no way to use this feature at this time.
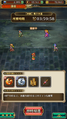
Near the bottom of the screen is a red orb which allows players to do quests and engage in battle with creatures from varying games within the series. Story quests allow players to proceed in the story while battle quests focus moreso on events, tower quests and collection quests.
At the bottom of the screen are six tabs. An exclamation mark on the tab means there is an issue that the player needs to address in that tab. The first tab leads directly to the Home screen. The second tab leads to the organization screen wherein you can arrange your party, their equipment and your formations. The third tab leads towards the Dojo screen, wherein you can train the heroes you've collected using the Dojo's resources. The fourth tab allows players to access the Smithy, where players can enhance, upgrade or sell their weapons. The fifth tab is the Gacha, where players can roll a set amount of gems to summon heroes. The last tab is the Shop where players can use real money currency to purchase gems or gem sets. Often the Shop tab will have a red icon stating there's a sale. Alternatively, Players may also access these tabs via clicking the entrances of the buildings on their Home screen.
Organization screen[edit]

Upon entering the organization screen, players are presented with four buttons.
- Party Organization screen
The first button is the Party Organization button which allows players to organize the party they use in battle. At the top of the screen is a copy button which allows players to copy the format of their party to the other party setups they can access. To the bottom of that button on the right is the overall attack power of the party. Players can also set and customize a total of ten parties. Heroes can be replaced by clicking on their vertical portrait. The "i" button allows players to see quick information about their selected hero. The hero's overall attack number is shown underneath their portrait. Equipment can be replaced by clicking the icon showing the four boxes. Players can equip weapons, armors and accessories to their heroes. Below the equipment boxes is the skill button. Players can equip inherited skills from duplicate heroes with the same style. It also shows players the rank and description of the skill. Below the skill button is the formation position of the selected hero. It shows either an advantage or disadvantage to the hero depending on the hero's placement in the formation. Below the formation position of the hero is the formation button which allows players to change the formation used in battle and to change the placement of heroes in battle. The formation's description and effects are also available to the players in this screen by pressing the "i" button.
- Error creating thumbnail: File missing
Party Organization screen.
Character Select screen.
Formations screen.
Equipment screen.
Skill Transfer screen.


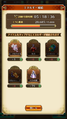
- Character Inventory screen
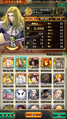
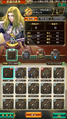
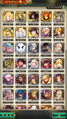
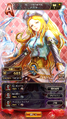
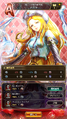
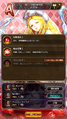
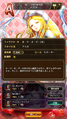
The second button shows the player's character inventory. It contains the heroes the player has summoned or received from events. To the top right of the list is a way to filter the units by ascending or descending order. In the first tab, they can be filtered through their levels, stats and resistances. In the second tab, they can be specifically filtered through their weapons, innate elements, resistances, their roles in battle, race, event abilities, gender and their games of origin. There is also a yellow button that can set these settings to the default filter. Clicking a character portrait will open their character page. The character page contains an image of their sprite, their artwork, the information about their overall attack, their abilities and their descriptions, their resistances, their passive abilities and their descriptions and a commentary on their capabilities. Their full artwork can also be seen by clicking the expand button on the middle of the screen. The arrows on either the left or the right will shift the screen towards the next character in the inventory.
Character Inventory screen.
Character screen.
Resistance screen.
Passive ability screen.
Commentary screen.
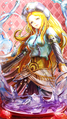
Artwork screen.


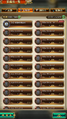
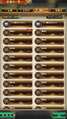
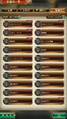
- Equipment Inventory screen
The third button shows the player's equipment inventory. There are four tabs indicating the type of equipment inventory. The first tab is the weapons inventory. Pressing a weapon in this inventory will show details such as its picture, name, rarity, how many times it can be upgraded, the overall effect on the hero's attack and additional stats it may grant the equipped hero. The weapons inventory can be filtered on the first tab by its levels, rarities, additional effects and whether or not it can be upgraded. The second tab allows players to filter the weapons by type, race and additional effects. The second tab is the armor inventory. Pressing an armor in this inventory will show details such as its picture, name, rarity, how many times it can be upgraded, the overall effect on the hero's resistances, whether or not it'll make a hero immune to status effects and additional stats it may grant the equipped hero. The armors inventory can be filtered on the first tab by levels, rarities, additional effects and whether or not it can be upgraded. The second tab allows player to filter the armors by rarity, type, resistances and status effect resistances. The third tab is the headgear inventory. Pressing a headgear in this inventory will show details such as its picture, name, rarity, how many times it can be upgraded, the overall effect on the hero's resistances, whether or not it'll make a hero immune to status effects and additional stats it may grant the equipped hero. The headgear inventory can be filtered on the first tab by levels, rarities, additional effects and whether or not it can be upgraded. The second tab allows player to filter the headgear by rarity, type, resistances and status effect resistances. The fourth tab is the accessories inventory. Pressing an accessory in this inventory will show details such as its picture, name, rarity, how many times it can be upgraded, the overall effect on the hero's resistances, whether or not it'll make a hero immune to status effects and additional stats it may grant the equipped hero. The accessories inventory can be filtered on the first tab by levels, rarities, additional effects and whether or not it can be upgraded. The second tab allows player to filter the accessories by rarity, type, resistances and status effect resistances.
Weapon Inventory screen.
Armor Inventory screen.
Headgear Inventory screen.
Accessory Inventory screen.


- Formations Inventory screen
The fourth tab shows the player's formations inventory. Details about the formation's effects can be accessed from this page. The following contains translations of the available formations within the game:
- See also: RS:RS formation
Formations Inventory screen.

Dojo screen[edit]

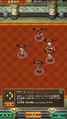
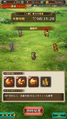
The Dojo screen shows Valdor to the left of screen and five buttons to the left of the screen. If the buttons are locked, the conditions required to unlock its functionality will be shown. These conditions usually involve clearing a particular stage. The first button brings you to the Style Level Up screen, where you can level up your styles with your accumulated experience. The second screen is the Style Level Break screen, where you can use Style pieces of any rarity to break the level of your style. Breaking the level of your style refers to increasing its level cap. The third screen is the Skill Upgrade screen, where you can upgrade the skills of your Style using materials you obtain from quests. The upgrade for these skills usually requires a book that may be obtained from event quests or specific battle quests. The fourth screen is the Expeditions screen, where you can send out five heroes for a set period of time and allow them to accumulate experience and stat growths. If the expedition is locked, the conditions required to unlock its functionality will be shown. These conditions usually involve clearing a particular stage. The last button is the Training screen, where you can send out three to five heroes for a set period of time and allow them to accumulate Style pieces.
- Style Level Up screen

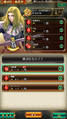
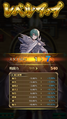
Pressing the first button will direct you to the Style Level Up inventory. In this inventory, you can select Styles to level up. Styles you can level up right now are indicated by a red diamond on the hero's portrait. Upon selecting a hero, you will be brought to the Level Up screen where you can see the experience that hero has accumulated. At the top of the screen, you can see the hero's name, weapon type and rarity. On the top right of the screen, you can access the selected hero's profile. Below that, the max level cap is shown and the hero's overall attack power is shown. Pressing the button in the middle of the screen will level up the hero. After leveling up the hero, their Style level will increase and the percentage increases will be displayed for their stats.

Style Inventory screen.
Style Growth screen.


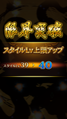
- Style Level Break screen

Pressing the second button will direct you to the Style Level Break inventory. In this inventory, you can select Styles to level break. Level break refers to increasing the Style's level cap. Styles you can level break right now are indicated by a red diamond on the hero's portrait. Upon selecting a hero, you will be brought to the Level Break screen where you can see what is required to level break the hero. At the top of the screen, you can see the hero's name, weapon type and rarity. On the top right of the screen, you can access the selected hero's profile. Below that, you can set how many level breaks there should be for the unit, granted you have the pieces required for the level break. The level break pieces are shown below that and the amount needed to level break that unit is also shown. Blank pieces can be used in lieu of actual pieces. Below those is the cost for level breaking. Pressing the button at the bottom of the screen will level break the hero. You will be prompted after pressing the button if you would still like to continue with the level break. Pressing yes will level break the hero and the hero's level cap will increase by the amount of times set.
Style Level Break Inventory screen.
Style is level broken.

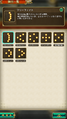
- Skill Upgrade screen

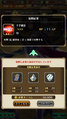
Pressing the third button will direct you to the Skill Upgrade inventory. In this inventory, you can select Styles to have their skills upgraded. Skill upgrade refers to increasing the Style's skill level. Styles you can skill upgrade right now are indicated by a red diamond on the hero's portrait. Upon selecting a hero, you will be brought to the Skill Upgrade screen where you can see what is required to skill upgrade their skills. The first skill for the Style only requires one upgrade, the second skill requires two upgrades and the third skill requires three upgrades. Clicking on the skill you would like to upgrade prompts a new window. This window shows the effect of the upgrade, such as reducing BP cost, the materials needed for the upgrade and the overall cost for the upgrade. Pressing the image for the materials will show where they can be obtained.
Skill Upgrade Inventory screen.
Upgrade a Skill screen.

- Expeditions screen

Pressing the fourth button will direct you to the Expeditions screen. The screen shows four expeditions. If the expedition is locked, the conditions required to unlock it will be shown. This usually involves clearing particular stages. Upon pressing an expedition, you can select five heroes to go on an expedition. The expeditions take some time depending on what expedition is taken. The four kinds of expeditions are Ruins Expedition which takes 2 hours, Sewer Expedition which takes 4 hours, Forest Expedition which takes 6 hours and Mountain Expedition which takes 12 hours. Expeditions can yield varying amounts of rewards, experience and stat growths. Expeditions can be sped up by either using the premium currency or by using expedition tickets. Expedition tickets can be obtained from daily missions or as rewards from either completing stages or exchanging for them at events.
Ruins Expedition screen.
Sewer Expedition screen.

Forest Expedition screen.
Mountain Expedition screen.


- Training Screen

Pressing the fifth button will direct you the Training screen, The screen shows five dummies being used by five heroes. Initially, there will only be two dummies however you can purchase the remaining dummies at a cost of 500 premium currency. Heroes can train with the dummies and yield Style pieces after an allotted amount of time. Training uses energy which is the gauge in the middle Energy can be replenished with consumption items. Pressing energy will allow you to refill the gauge. The Food screen will have the consumption items needed to replenish the energy gauge. Clicking the picture of the item will use it to replenish the energy. Depending on the item chosen, energy may replenish at different rates. In order to restock the item if you have run out, click the plus sign. Restocking the item will come at a specified cost listed on the screen.
Food screen.

Smithy screen[edit]
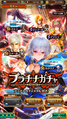
Gacha screen[edit]

Pressing the Gacha button will lead you to the Gacha screen. If you are a new player, you will see a deal for a guaranteed SS gacha. This gacha will last for 72 hours of your playthrough. It will require 3000 in premium currency which can be purchased with real money. Each Gacha costs 3000 premium currency to roll 10 units. A single unit costs 300 premium currency. A 100 roll can be made but only with purchased premium currency. When rolling, you will find yourself in the Professor's laboratory. Pulling the lever will yield an animation that will grant you your units. If the explosion is gold, you are guaranteed an SS-rarity unit. If the professor kicks the machine, you are guaranteed an S-rarity unit.
Clicking the button at the top right of the screen will show the gacha rate. The usual rate for SS-units are 0.1%.
Christmas Gacha screen.
Regular Gacha screen.
Ticket Gacha screen.

The Professor grants guaranteed S unit.
The Professor grants guaranteed S unit.


Shop screen[edit]
Skill Inheritance[edit]
Skill inheritance is a mechanic wherein your unit can inherit skills from other units. How this works is that you will need two units who have the same style. Units with the same style are usually duplicate units or units of the same class in their game of origin. The process works as follows:
- Have two units of the same style, for example: Hector and Orion or Azami A-rank and Azami SS-rank.
- Learn all the skills for both units, the lightbulbs must be on.
- After learning all the skills for both units or whoever's skill you want to transfer over, go to the Party Organization screen.
- When in the Party Organization screen, press the giant + (plus) button and the skills you want to transfer
will be shown.
Tier Lists[edit]
Tier lists are used to determine the kind of units you should be attempting to obtain or acquire to ensure a smooth game experience. Your mileage may vary. The following are resources that provide reasoning for the listed characters:
- Gamerch Tier List: https://gamerch.com/saga-reuniverse/entry/58109
- Altema Tier List: https://altema.jp/romasagars/risemara
- Gamewith Tier List: https://gamewith.jp/saga-reuniverse/article/show/133412
Tips and Tricks[edit]
The following are tips and tricks which can help assist players:
- If your stats are lacking and you have plateaued at a particular quest, consider doing an expedition with the characters you are using. Go to the expeditions screen and then enter those 5 units into that expedition. Then, use your skip tickets to finish the expedition. Doing so will grant those characters additional stat bonuses to their HP, attack and etc. Rinse and repeat until you have exhausted your tickets or feel that your stats are now sufficient.
- Be sure to roll at least once a day. You have a free single roll every day.
- The EXP dungeon and the Money dungeons are available 2x per day. They can be found in the third quest tab. Being defeated in these dungeons will not count as an attempt.
- When you lose and/or are defeated, you will only lose 2 of the energy you spent on the quest.
